Mac OSX Bootable RecoreveryHD :)

This great great app (Boot Disk Utility by Cvad) helped me make a Mac bootable flash drive with the OSX RecoveryHD ...
here is the full story :

I was trying to install windows on my iMac using the regular bootcamp procedure..
but something went horribly wrong, and I ended up with a fully wiped hard disk!!
and to my disappointment, all OSX Installation methods available to me at the time did not work!!

So I started researching and found this app...
within the app itself is the following help text:

    HOW-TO create a Clover Bootable Flash drive
    with MAC OS X HD Recovery:

1. Fine-tune the BDU [Configuration] (By default, not required).
2. Select any Flash Drive (may be tested on virtual or hard drives, too).
3. [Format] selected Flash Drive into 2 partitions:
    Clover bootloader will be automatically installed to the 1st Partition.
4. Open [Download Center], [Update] HD Recovery Download List
    and [DL] any Apple MAC OS X HD Recovery. HFS-Image will be
    automatically extracted from pkg to the BDUImage Local Repo.
5. [Restore ...] HFS-Image file to the 2nd Disk Partition
6. Enjoy :-)

PS; I found some interesting results when searching by:
RecoveryHDUpdate inurl:swscan.apple.com
RecoveryHDUpdate.pkg inurl:swscan.apple.com

Sherlock S04 E02 IS UNBELIEVABLE!!

Well.. I had to write about this :)

"The Lying Detective "

An episode of the amazing British series of Crime, Drama, Mystery, And Awesomeness :) :) :)
I was lured into watching this single episode two times IN A ROW...
Can you believe that ?!! I watched the same episode TWICE in the same evening :) :) :) :)
And I enjoyed the second time more than the first  :) :) :)
And I can't stop smiling  :) :) :) :) :) :) :) :)
That's all I'm going to say about this for now  :) :)
Go do yourself a favor and have a heavenly 1.5 hours of joy :) :)

Allocation unit size...

Which Allocation Unit Size Works Best?
(From a makeuseof article by Tina Sieber)

Hard drives are organized in (allocation units) called clusters and the allocation unit size is the size of a single cluster.
The file system records the state of each cluster, i.e. free or occupied. Once a file or a portion of a file is written to a cluster, the cluster is occupied, regardless of whether or not there is still space. Hence, larger clusters can lead to more wasted or slack space. With smaller clusters, however, the drive becomes slower as each file is broken up into smaller pieces and it takes much longer to draw them all together when the file is accessed.
So the optimal allocation unit size depends on what you want to do with your USB drive. If you want to store large files on that drive, a large cluster size is better as the drive will be faster. If, however, you want to store small files or run programs off your flash drive, a smaller cluster size will help preserve space.

Rule of thumb: large drive and/or large files = large allocation unit size

For a 500 MB USB flash drive, rather select 512 bytes (FAT32) or 32 kilobytes (FAT). On a 1 TB external hard drive select 64 kilobytes (NTFS).

USB flas drive fix

So.. I was trying to fix an old USB flash drive ... a  512 MB :) just for fun. and I thought I should share what worked for me...


http://www.flashdrive-repair.com/search/label/SSS%20Firmware

https://drive.google.com/open?id=0B2jvhmKQdstPVGNyR204b3p5UW8
the tool with the !!! is the one that worked for me

Booting from BIOS vs UEFI, what is going on?

So I was trying to understand the difference between ordinary PC booting and MAC OSX, and I've come across a lot of new -to me!- tech jargon like: CSM - UEFI - EFI. Also, I found this app "BootDiskUtility" that uses this boot loader "Clover" to do something very weird like booting OSX on a PC !! very new stuff to me :)

Found this great article describing the UEFI technology:

https://www.happyassassin.net/2014/01/25/uefi-boot-how-does-that-actually-work-then/

Ad blocking dilemma

Anti - Anti - Ad Blocking is here  !! :) :)
check this out:
https://reek.github.io/anti-adblock-killer/


anti-adblock-killer

Anti - Anti - Ad Block


 blockadblock

Anti - Ad Blocking


Ad-Blockers

Advertisements

Torrentz All in One is all over :(

After the take down of the great Torrentz.eu, I was left in a vast lake of sorrow :( , I really really liked that site...
But after a while, I found some mirrors for the same site, and that was really great, but I used to have a user script that made Torrentz even better.. "Torrentz All in One".. this user script used to add really useful options to Torrentz, or like its developer say:
"IT Does everything you wish Torrentz could do!"
The situation became unbearable when I found out that "" -the script developer- has abandoned the project :(....
After a long search I found a FORK that was taken by "" before the take-down of the project..  then I decided to write this blog post in order to share this info and to "save" a copy of the last version of the code in case it gets deleted again...


How to jump to a registry key directly ?


How to jump to a registry key directly ?


When you start Regedit, it automatically opens the last key that was viewed. (Registry Editor in Windows XP saves the last viewed registry key in a separate location). If you wish to jump to a particular registry key directly without navigating the paths manually, you may use any of these methods / tools.


Option 1

Using a VBScript:  Copy these lines to a Notepad document as save as registry.vbs
'Launches Registry Editor with the chosen branch open automatically
'Author  : Ramesh Srinivasan
'Website: http://windowsxp.mvps.org

Set WshShell = CreateObject("WScript.Shell")
Dim MyKey
MyKey = Inputbox("Type the Registry path")
MyKey = "My Computer\" & MyKey
WshShell.RegWrite "HKCU\Software\Microsoft\Windows\CurrentVersion\Applets\Regedit\Lastkey",MyKey,"REG_SZ"
WshShell.Run "regedit", 1,True
Set WshShell = Nothing
Double-click Registry.vbs and then type the full registry path which you want to open. [ Example: HKEY_CLASSES_ROOT\.MP3 ]
Limitation: The above method does not help if Regedit is already open.


Option 2

Regjump from Sysinternals.com
This little command-line applet takes a registry path and makes Regedit open to that path. It accepts root keys in standard (e.g. HKEY_LOCAL_MACHINE) and abbreviated form (e.g. HKLM).
Usage: regjump [path]
Example: C:\Regjump HKEY_CLASSES_ROOT\.mp3


Option 3

12Ghosts JumpReg from 12ghosts.com
Jump to registry keys from a tray icon! This is a surprisingly useful tool. You can manage and directly jump to frequently accessed registry keys. Unlimited list size, jump to keys and values, get current key with one click, jump to key in clipboard, jump to same in key in HKCU or HKLM. Manage and sort keys with comments in an easy-to-use tray icon menu. Create shortcuts for registry keys.


Option 4

To Jump to Registry key from Internet Explorer / Firefox, use my menu extension here:

Firefox Extensions & Mods That I Love :)

First of all is AdblockPlus 
 There are many Anti-advertising  extensions out there... but I really love this one
 It just needs a little tweak here or there and it is perfect...
 just disable "allow some non intrusive advertising" and install the second extension:

Second is Element Hiding Helper :)
 this one helps you in hiding undetected ads

Third is Grease Monkey
this great extension helps you do all sorts of useful mods (and fun ones too) to your favorite sites..

And of course the lovely user script Torrentz All In One
this one really revolutionizes the famous torrent site "torrentz.com"
here is its homepage and here is its installation link

and you will have to add these to the script to get it to work:
 
// @include       http://www.torrentz.com/*
// @include       https://www.torrentz.com/*
// @match         http://www.torrentz.com/*
// @match         https://www.torrentz.com/*

// @include       http://torrentz.com/*
// @include       https://torrentz.com/*
// @match         http://torrentz.com/*
// @match         https://torrentz.com/*


and lets not forget the "about:config" mod 
browser.search.openintab
to open searches in new tab instead of overwriting the current tab.

Locked bootloaders...

VEEERY SAD NEWS: MY gt-i9300i HAS A LOCKED BOOTLOADER !!

Apparently our Samsung galaxy S3 NEO has its "bootloader" locked... Ie. We can't install a custom recovery like CWM or TWRP.

And I managed to discover this the hard way :-)

Apparently not all s3 variants are locked.. as I found some youtube videos showing guys installing custom recoveries..

Anyways... I was trying to install a custom recovery image on my phone (Clockwork Mod Recovery to be specific) and I ended up being stuck at the odin mode screen...

By the way.. There are multiple methods to install a custom recovery (ODIN Flashing - Flashify - RomToolBox - TWRP Manager).. and multiple recoveries too (CWM - TWRP)..
But non of them worked for me.. and some methods (like flashing cwm img by flashify) left me stuck on a screen looking like this:


Every time I start the phone it says "Could not do normal boot - Odin Mode"


So here is how I got myself unstuck - out of odin mode :-) :

1. Turn the phone off completely.
2. Hold Volume Down + Home and power up.
3. You will get a screen like this.. press Volume Down to restart.

Thats it.. the phone will reatart normally.. Even if you do not have a recovery partition at all.

Microsoft taking away your storage!!


Microsoft is taking away our storage!!


Out of no where... I get a veeery ugly email from microsoft:


"We want to let you know about some upcoming changes to OneDrive. On 7/13/2016, the amount of storage that comes with OneDrive will change from 15 GB to 5 GB. We are also discontinuing the 15 GB camera roll bonus. You can learn more at our FAQ."


"These changes were necessary to ensure that we can continue to offer a collaborative, connected, and intelligent service."


If you have a free OneDrive plan and will be over your storage quota as a result of these changes:


If you are a free user and have over 5 GB of content in your OneDrive, you will receive an email with an offer to claim a free 1-year subscription to Office 365 Personal*, which includes 1 TB of storage.


If you do not claim this offer, you will need to purchase additional storage or remove some of your files. Otherwise, 90 days after you receive your first notice, your account will become read-only.


If you are over quota after the 90 days, you will still have access to your files for 9 months. You can view and download them. However, you will not be able to add new content.


If after 9 months you are still over quota, your account will be locked. That means that you will not be able to access the content in your OneDrive until you take action.


If after 6 more months you fail to take action, your content may be deleted.


Display Drive Letters On Drive Icons In Windows

HDD Letter Icons This is a collection of 26 harddrive icons, lettered A to Z, to replace the generic icon that Windows uses by default. They are based on Vista's external HDD icon.
Here's how it looks:

How to install

Just Download the zip file, Extract it to c:\Drive Icons\ And add Install.reg to your registry.

Thanks goes to the creator whoever he is

I couldn't find him :)

Registry code (you will not need this)

Windows Registry Editor Version 5.00

[HKEY_LOCAL_MACHINE\SOFTWARE\Microsoft\Windows\CurrentVersion\Explorer\DriveIcons]

[HKEY_LOCAL_MACHINE\SOFTWARE\Microsoft\Windows\CurrentVersion\Explorer\DriveIcons\A]

[HKEY_LOCAL_MACHINE\SOFTWARE\Microsoft\Windows\CurrentVersion\Explorer\DriveIcons\A\DefaultIcon]                            
@="C:\\Drive Icons\\HDD_A.ico"    

[HKEY_LOCAL_MACHINE\SOFTWARE\Microsoft\Windows\CurrentVersion\Explorer\DriveIcons]

[HKEY_LOCAL_MACHINE\SOFTWARE\Microsoft\Windows\CurrentVersion\Explorer\DriveIcons\B]

[HKEY_LOCAL_MACHINE\SOFTWARE\Microsoft\Windows\CurrentVersion\Explorer\DriveIcons\B\DefaultIcon]                            
@="C:\\Drive Icons\\HDD_B.ico"    

[HKEY_LOCAL_MACHINE\SOFTWARE\Microsoft\Windows\CurrentVersion\Explorer\DriveIcons]

[HKEY_LOCAL_MACHINE\SOFTWARE\Microsoft\Windows\CurrentVersion\Explorer\DriveIcons\C]

[HKEY_LOCAL_MACHINE\SOFTWARE\Microsoft\Windows\CurrentVersion\Explorer\DriveIcons\C\DefaultIcon]                            
@="C:\\Drive Icons\\HDD_C.ico"    

[HKEY_LOCAL_MACHINE\SOFTWARE\Microsoft\Windows\CurrentVersion\Explorer\DriveIcons]

[HKEY_LOCAL_MACHINE\SOFTWARE\Microsoft\Windows\CurrentVersion\Explorer\DriveIcons\D]

[HKEY_LOCAL_MACHINE\SOFTWARE\Microsoft\Windows\CurrentVersion\Explorer\DriveIcons\D\DefaultIcon]                            
@="C:\\Drive Icons\\HDD_D.ico"    

[HKEY_LOCAL_MACHINE\SOFTWARE\Microsoft\Windows\CurrentVersion\Explorer\DriveIcons]

[HKEY_LOCAL_MACHINE\SOFTWARE\Microsoft\Windows\CurrentVersion\Explorer\DriveIcons\E]

[HKEY_LOCAL_MACHINE\SOFTWARE\Microsoft\Windows\CurrentVersion\Explorer\DriveIcons\E\DefaultIcon]                            
@="C:\\Drive Icons\\HDD_E.ico"    

[HKEY_LOCAL_MACHINE\SOFTWARE\Microsoft\Windows\CurrentVersion\Explorer\DriveIcons]

[HKEY_LOCAL_MACHINE\SOFTWARE\Microsoft\Windows\CurrentVersion\Explorer\DriveIcons\F]

[HKEY_LOCAL_MACHINE\SOFTWARE\Microsoft\Windows\CurrentVersion\Explorer\DriveIcons\F\DefaultIcon]                            
@="C:\\Drive Icons\\HDD_F.ico"    

[HKEY_LOCAL_MACHINE\SOFTWARE\Microsoft\Windows\CurrentVersion\Explorer\DriveIcons]

[HKEY_LOCAL_MACHINE\SOFTWARE\Microsoft\Windows\CurrentVersion\Explorer\DriveIcons\G]

[HKEY_LOCAL_MACHINE\SOFTWARE\Microsoft\Windows\CurrentVersion\Explorer\DriveIcons\G\DefaultIcon]                            
@="C:\\Drive Icons\\HDD_G.ico"    

[HKEY_LOCAL_MACHINE\SOFTWARE\Microsoft\Windows\CurrentVersion\Explorer\DriveIcons]

[HKEY_LOCAL_MACHINE\SOFTWARE\Microsoft\Windows\CurrentVersion\Explorer\DriveIcons\H]

[HKEY_LOCAL_MACHINE\SOFTWARE\Microsoft\Windows\CurrentVersion\Explorer\DriveIcons\H\DefaultIcon]                            
@="C:\\Drive Icons\\HDD_H.ico"    

[HKEY_LOCAL_MACHINE\SOFTWARE\Microsoft\Windows\CurrentVersion\Explorer\DriveIcons]

[HKEY_LOCAL_MACHINE\SOFTWARE\Microsoft\Windows\CurrentVersion\Explorer\DriveIcons\I]

[HKEY_LOCAL_MACHINE\SOFTWARE\Microsoft\Windows\CurrentVersion\Explorer\DriveIcons\I\DefaultIcon]                            
@="C:\\Drive Icons\\HDD_I.ico"    

[HKEY_LOCAL_MACHINE\SOFTWARE\Microsoft\Windows\CurrentVersion\Explorer\DriveIcons]

[HKEY_LOCAL_MACHINE\SOFTWARE\Microsoft\Windows\CurrentVersion\Explorer\DriveIcons\J]

[HKEY_LOCAL_MACHINE\SOFTWARE\Microsoft\Windows\CurrentVersion\Explorer\DriveIcons\J\DefaultIcon]                            
@="C:\\Drive Icons\\HDD_J.ico"    

[HKEY_LOCAL_MACHINE\SOFTWARE\Microsoft\Windows\CurrentVersion\Explorer\DriveIcons]

[HKEY_LOCAL_MACHINE\SOFTWARE\Microsoft\Windows\CurrentVersion\Explorer\DriveIcons\K]

[HKEY_LOCAL_MACHINE\SOFTWARE\Microsoft\Windows\CurrentVersion\Explorer\DriveIcons\K\DefaultIcon]                            
@="C:\\Drive Icons\\HDD_K.ico"    

[HKEY_LOCAL_MACHINE\SOFTWARE\Microsoft\Windows\CurrentVersion\Explorer\DriveIcons]

[HKEY_LOCAL_MACHINE\SOFTWARE\Microsoft\Windows\CurrentVersion\Explorer\DriveIcons\L]

[HKEY_LOCAL_MACHINE\SOFTWARE\Microsoft\Windows\CurrentVersion\Explorer\DriveIcons\L\DefaultIcon]                            
@="C:\\Drive Icons\\HDD_L.ico"    

[HKEY_LOCAL_MACHINE\SOFTWARE\Microsoft\Windows\CurrentVersion\Explorer\DriveIcons]

[HKEY_LOCAL_MACHINE\SOFTWARE\Microsoft\Windows\CurrentVersion\Explorer\DriveIcons\M]

[HKEY_LOCAL_MACHINE\SOFTWARE\Microsoft\Windows\CurrentVersion\Explorer\DriveIcons\M\DefaultIcon]                            
@="C:\\Drive Icons\\HDD_M.ico"    

[HKEY_LOCAL_MACHINE\SOFTWARE\Microsoft\Windows\CurrentVersion\Explorer\DriveIcons]

[HKEY_LOCAL_MACHINE\SOFTWARE\Microsoft\Windows\CurrentVersion\Explorer\DriveIcons\N]

[HKEY_LOCAL_MACHINE\SOFTWARE\Microsoft\Windows\CurrentVersion\Explorer\DriveIcons\N\DefaultIcon]                            
@="C:\\Drive Icons\\HDD_N.ico"    

[HKEY_LOCAL_MACHINE\SOFTWARE\Microsoft\Windows\CurrentVersion\Explorer\DriveIcons]

[HKEY_LOCAL_MACHINE\SOFTWARE\Microsoft\Windows\CurrentVersion\Explorer\DriveIcons\O]

[HKEY_LOCAL_MACHINE\SOFTWARE\Microsoft\Windows\CurrentVersion\Explorer\DriveIcons\O\DefaultIcon]                            
@="C:\\Drive Icons\\HDD_O.ico"    

[HKEY_LOCAL_MACHINE\SOFTWARE\Microsoft\Windows\CurrentVersion\Explorer\DriveIcons]

[HKEY_LOCAL_MACHINE\SOFTWARE\Microsoft\Windows\CurrentVersion\Explorer\DriveIcons\P]

[HKEY_LOCAL_MACHINE\SOFTWARE\Microsoft\Windows\CurrentVersion\Explorer\DriveIcons\P\DefaultIcon]                            
@="C:\\Drive Icons\\HDD_P.ico"    

[HKEY_LOCAL_MACHINE\SOFTWARE\Microsoft\Windows\CurrentVersion\Explorer\DriveIcons]

[HKEY_LOCAL_MACHINE\SOFTWARE\Microsoft\Windows\CurrentVersion\Explorer\DriveIcons\Q]

[HKEY_LOCAL_MACHINE\SOFTWARE\Microsoft\Windows\CurrentVersion\Explorer\DriveIcons\Q\DefaultIcon]                            
@="C:\\Drive Icons\\HDD_Q.ico"    

[HKEY_LOCAL_MACHINE\SOFTWARE\Microsoft\Windows\CurrentVersion\Explorer\DriveIcons]

[HKEY_LOCAL_MACHINE\SOFTWARE\Microsoft\Windows\CurrentVersion\Explorer\DriveIcons\R]

[HKEY_LOCAL_MACHINE\SOFTWARE\Microsoft\Windows\CurrentVersion\Explorer\DriveIcons\R\DefaultIcon]                            
@="C:\\Drive Icons\\HDD_R.ico"    

[HKEY_LOCAL_MACHINE\SOFTWARE\Microsoft\Windows\CurrentVersion\Explorer\DriveIcons]

[HKEY_LOCAL_MACHINE\SOFTWARE\Microsoft\Windows\CurrentVersion\Explorer\DriveIcons\S]

[HKEY_LOCAL_MACHINE\SOFTWARE\Microsoft\Windows\CurrentVersion\Explorer\DriveIcons\S\DefaultIcon]                            
@="C:\\Drive Icons\\HDD_S.ico"    

[HKEY_LOCAL_MACHINE\SOFTWARE\Microsoft\Windows\CurrentVersion\Explorer\DriveIcons]

[HKEY_LOCAL_MACHINE\SOFTWARE\Microsoft\Windows\CurrentVersion\Explorer\DriveIcons\T]

[HKEY_LOCAL_MACHINE\SOFTWARE\Microsoft\Windows\CurrentVersion\Explorer\DriveIcons\T\DefaultIcon]                            
@="C:\\Drive Icons\\HDD_T.ico"    

[HKEY_LOCAL_MACHINE\SOFTWARE\Microsoft\Windows\CurrentVersion\Explorer\DriveIcons]

[HKEY_LOCAL_MACHINE\SOFTWARE\Microsoft\Windows\CurrentVersion\Explorer\DriveIcons\U]

[HKEY_LOCAL_MACHINE\SOFTWARE\Microsoft\Windows\CurrentVersion\Explorer\DriveIcons\U\DefaultIcon]                            
@="C:\\Drive Icons\\HDD_U.ico"    

[HKEY_LOCAL_MACHINE\SOFTWARE\Microsoft\Windows\CurrentVersion\Explorer\DriveIcons]

[HKEY_LOCAL_MACHINE\SOFTWARE\Microsoft\Windows\CurrentVersion\Explorer\DriveIcons\V]

[HKEY_LOCAL_MACHINE\SOFTWARE\Microsoft\Windows\CurrentVersion\Explorer\DriveIcons\V\DefaultIcon]                            
@="C:\\Drive Icons\\HDD_V.ico"    

[HKEY_LOCAL_MACHINE\SOFTWARE\Microsoft\Windows\CurrentVersion\Explorer\DriveIcons]

[HKEY_LOCAL_MACHINE\SOFTWARE\Microsoft\Windows\CurrentVersion\Explorer\DriveIcons\W]

[HKEY_LOCAL_MACHINE\SOFTWARE\Microsoft\Windows\CurrentVersion\Explorer\DriveIcons\W\DefaultIcon]                            
@="C:\\Drive Icons\\HDD_W.ico"    

[HKEY_LOCAL_MACHINE\SOFTWARE\Microsoft\Windows\CurrentVersion\Explorer\DriveIcons]

[HKEY_LOCAL_MACHINE\SOFTWARE\Microsoft\Windows\CurrentVersion\Explorer\DriveIcons\X]

[HKEY_LOCAL_MACHINE\SOFTWARE\Microsoft\Windows\CurrentVersion\Explorer\DriveIcons\X\DefaultIcon]                            
@="C:\\Drive Icons\\HDD_X.ico"    

[HKEY_LOCAL_MACHINE\SOFTWARE\Microsoft\Windows\CurrentVersion\Explorer\DriveIcons]

[HKEY_LOCAL_MACHINE\SOFTWARE\Microsoft\Windows\CurrentVersion\Explorer\DriveIcons\Y]

[HKEY_LOCAL_MACHINE\SOFTWARE\Microsoft\Windows\CurrentVersion\Explorer\DriveIcons\Y\DefaultIcon]                            
@="C:\\Drive Icons\\HDD_Y.ico"    

[HKEY_LOCAL_MACHINE\SOFTWARE\Microsoft\Windows\CurrentVersion\Explorer\DriveIcons]

[HKEY_LOCAL_MACHINE\SOFTWARE\Microsoft\Windows\CurrentVersion\Explorer\DriveIcons\Z]

[HKEY_LOCAL_MACHINE\SOFTWARE\Microsoft\Windows\CurrentVersion\Explorer\DriveIcons\Z\DefaultIcon]
@="C:\\Drive Icons\\HDD_Z.ico"

At Last.... The Loooong Lost Mario Game :)

So I was searching "again" for this "Mario" clone I used to play ages ago... And guess what :) I found it this time :) Along with a full story of where it originally started :)


Let Me Start By: >Download<
this is a standalone package that I made using the raptor version :)


Apparently this game was written by a developer called "Mike Wiering" to 'practice VGA programming' as he says :) .


Anyways :) Thank you Mike for creating such a beautiful piece, I had had a lot of good memories with it ;)


Here are the copies I found online:


How to Run The Game:

I tried very hard to get this game to work... and after some research I found that in order to run this game in modern windows enviroment you will need some emulation software like  DOSBox.


In Game Controls:

  • Walk with [Left] and [Right] 
  • Jump with [Alt]
  • Hold [Ctrl] down to run faster and jump further
  • Fire with [Space] (you can use [Up] or [Down] to aim while firing)
  • Press [Down] at the end of a level to go down into the pipe. 
  • Quit the game with [Esc] .


Here is The Developer's Site:
http://www.wieringsoftware.nl

Another mention:
http://www.dosgamesarchive.com

A Collection Of other remakes:
http://compactiongames.about.com

Force A Device Driver Installation

Got a Vista Driver That Won't Install on Windows 7?  Here's How To Fix Most of Those Problems

As I settle into using a Windows 7 laptop all day every day, I run into driver problems now and then.  Now, understand — I'm running 64-bit Windows 7 and I used to run 64-bit Vista, and in theory "if it's a Vista driver, it's a Win 7 driver."  But sometimes it seems that the drivers (or, rather, their driver's setup programs) don't seem to know that, and won't install correctly.  So here are a couple of tips that I've used to good effect.

Has Installing This Driver Been a Problem Even Before Windows 7?

Setting up my Win 7 systems has led to a number of problems installing USB-attached devices.  I started cursing Windows 7, until I eventually remembered that I'd seen problems with some of these drivers before.  I've occasionally had troubles installing drivers for USB-attached devices in XP and Vista if I'm running VMWare Workstation.  VMWare's usually-convenient ability to let me directly connect USB devices to particular VMs has gotten in the way of a few driver installs, but because I'd not run into that problem in a while, I'd forgotten an old rule:  when installing something USB-related for the first time and it won't install, make sure VMWare's not running.

Lie to the Driver

I was trying to get the driver for my Edirol UA-4FX USB audio capture box (the reasonably-priced tool that makes recording my newsletters easy) to load, but it refused, as the driver's setup.exe installation routine complained:
"The operating system that you are using is not supported.  Please check the supported operating systems.  Setup will be terminated."
Ah, I thought, the old "I'm not gonna run even if I could run, just because my programmer put a paranoid version check into the setup program" trick.  Heck, I know how to fix that:  just tell the setup program what it wants to hear.  To do that, make it believe that your OS is not that newfangled, frightening Windows 7 but instead good old Vista SP1.  (Anyone out there remember the "setver" command in DOS?)  Here's how I accomplished it, Windows 7-style:
  1. I right-clicked setup.exe and clicked Properties.
  2. In the resultant property page, I clicked the the "Compatibility" tab.
  3. On that page, I checked the box labeled "Run this program in compatibility mode for" and then selected "Windows Vista (Service Pack 1)."
Thus, when the Setup program asks the operating system its version, Windows 7 responds "Vista SP1" rather than the truth, the setup program gets Win 7 to swallow the drivers and all is well.

Slip the Driver in the Back Door

Even the "call it Vista SP1" thing doesn't work for some drivers, and when that happens, I skip the setup programs and all of the other GUI nonsense and talk directly to the operating system using the pnputil command.  Pnputil.exe is a command that first appeared in Vista.  It's a command-line tool (which means it's also useful in Server Core) that lets you install a driver on a system before you ever physically install the hardware that the driver's associated with, as pnputil has the power to pre-populate the "driver store" with a driver.  To use it, you
  1. Get the driver for the hardware that you want to install.  Different companies package their drivers in different ways, but most either offer a zip file or an EXE that's basically just a self-extracting zip file.
  2. Run the EXE or extract the zip's contents and you'll usually have a folder full of of files with extensions like DLL, CAT, SYS, and at least one with the extension ".INF."
  3. Open an elevated command prompt and type pnputil -i -a name-of-folder\*.inf, like "pnputil -i -a c:\newdriver\*.inf."  The system will think about it for a moment or two and report that you've properly installed the driver.
Now, understand that this won't fix all problems, as some drivers were written sort of lamely in the first place back in the Vista days (like the ones for my Tascam US-144), but these should help in many cases.

From:
 www.minasi.com/newsletters/nws0908a.htm

Reverse Tethering...

How to share your PC internet connection from your PC to your Android phone using the USB cable:


There are several ways of achieving this, most notable ones are:

In both methods you will need SAMSUNG USB NDIS Network Drivers 
From Here

Use your windows 7 to setup a Software Access Point

This Is A Very Beautiful and Useful Blog Post that I HAD TO re-blog :)
Many Thanks For the Original Writer :) 


This is about sharing your PC internet connection wirelessly with your devices


here is another useful Post & Tool

==================================

[Tutorial]
Use your windows 7 to setup a Software Wireless Access Point (SoftAP)
to share your PC Internet connection without any extra hardware or
software (NOT Ad-Hoc)


I got my Nexus 7 a few days ago, and it doesn't have a 3g modem in it. That means I cannot use a mobile internet with this device. Tried to create an ad hoc network in my windows 7 pc, and it cannot even detect the ad hoc network. This is already a known problem for android ICS (ice Cream Sandwich) and Jelly Bean. After some research, I found out that ICS and JB only can detect
"Infrastructure" based WiFi signal. Ad hoc network is using another type of signal that ICS and JB cannot detect unless you root and tweak your phone's wpa_supplicant files. In which they are known to cause abnormal behavior of the OS itself.


     So, I call myself an IT professional and a hacker.
How can I surrender to such a small problem! There must be a solution
somewhere. Again, after some research, I realized that Windows 7
actually provide 2 drivers for a network card. Basically 1 of it is what
you use everyday, as a client that receive service from an AP. The
other 1, is the driver to make your wireless network card an wireless
access point itself! (SoftAP)


“On
Windows 7 and later, the operating system installs a virtual device if a
Hosted Network capable wireless adapter is present on the machine. This
virtual device normally shows up in the “Network Connections Folder” as
‘Wireless Network Connection 2’ with a Device Name of ‘Microsoft
Virtual WiFi Miniport adapter’ if the computer has a single wireless
network adapter. This virtual device is used exclusively for performing
software access point (SoftAP) connections and is not present in the
list returned by the WlanEnumInterfaces function. The lifetime of this
virtual device is tied to the physical wireless adapter. If the physical
wireless adapter is disabled, this virtual device will be removed as
well.”


OK! SO THEY HAVE THIS HANDY FEATURE BUT WHY I NEVER SEE IT?


ANSWER: Basically there is no native GUI to do all this, so you have to use command prompt to do all this.


Following will be the step by step guide to setup a SoftAP using your windows 7 without any additional application. If you want to use an application to do this, there are some out there in the market, 1 of it i think is good is called Connectify, I never tried it though so I won't comment on it.


Basically, to setup an SoftAP, then share ur PC internet to this SoftAP
and then make sure devices that connect to this SoftAP takes 5 major
steps:


1) Setup the SoftAP

2) Share the Internet to SoftAP

3) Startup the services required for Internet Sharing

4) Start your SoftAP

5) make sure your device connect properly to the SoftAP


and here we GO:

________________________________________________________

1) Setup the SoftAP


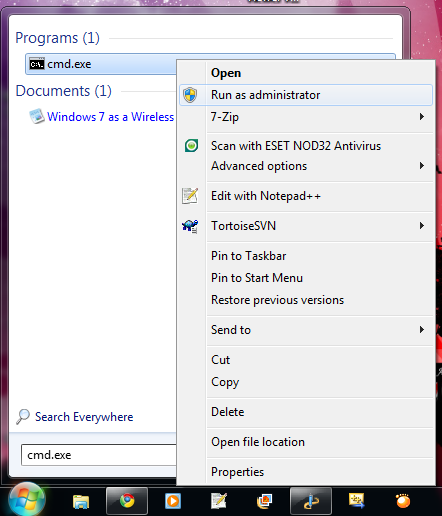
i) Run cmd.exe as administrator and enter the following command.
Substitute "ssid" with the SoftAP name u  desired and "passphrase" with
the password to connect to the SoftAP u desired, both without the
quotation marks. This will create the required “Microsoft Virtual WiFi
Miniport adapter” and also set up your hostednetwork.


netsh wlan set hostednetwork mode=allow ssid="ssid" key="passphrase" keyUsage=persistent

Run cmd as Administrator
The command and its appropriate output if success (Click to enlarge)
Microsoft Virtual WiFi Miniport Adapter will shown if success (Click to enlarge)
     Voila, first step is done, your SoftAP interface is now available, next up we will need to do the Internet sharing.

_________________________________________________________________________________

2) Share the Internet to SoftAP


i) Open network and sharing centre

ii) Click Change Adapter Setting

iii) Select the adapter that are connected to the internet, "Right Click" -> "Properties"

iv) Click on "Sharing' tab

v) Check the checkbox that says "Allow other network users to connect
through this computer's Internet connection". In the dropdownbox, select
the SoftAP (In my case, Wireless Network Connection 5)

Click to enlarge
vi) Step 2 DONE!


_________________________________________________________________________________

3) Startup the services required for Internet Sharing


This step is the most technical step of all the steps


i) Run services.msc. (Type services.msc in start menu and you will have it)

ii) Find the following item in the list and start them IF THEY ARE NOT (Right click -> Start):


**If you want these services start after you restart computer, change their properties to Automatic**

--

Application Layer Gateway Service

Network Connections

Network Location Awareness (NLA)

Plug And Play

Remote Access Auto Connection Manager

Remote Access Connection Manager

Remote Procedure Call (RPC)

Telephony

Windows Firewall

--

**If you want these services start after you restart computer, change their properties to Automatic**


Click to enlarge
iii) After all services are started, Step 3 is done


_________________________________________________________________________________

4) Start your SoftAP


This step is easy, the command to start/stop the hostednetwork is “netsh wlan start|stop hostednetwork”
and it needs to be run as adminstrator. Since you will have to
start/stop the hostednetwork every time you start/stop your computer, I
would advice you to create desktop shortcuts for there commands and set
them to run as administrator.


Shortcut to start hostednetwork
Shortcut to stop the hostednetwork
MISSION ACCOMPLISHED!! After run "netsh wlan start hostednetwork"


_________________________________________________________________________________

5) make sure your device connect properly to the SoftAP


Now, the setup of this AP is successful. In order to connect to this
SoftAP, I find it best to use static IP, else it will have quite some
connection problem. The setting is as following:


**Set this in the device you want to connect to the SoftAP**

--

IP: range from 192.168.137.2 to 192.168.137.254

Subnet mask: 255.255.255.0

Default gateway: 192.168.137.1

DNS: 8.8.8.8

alternate DNS: 8.8.4.4

--

**Set this in the device you want to connect to the SoftAP**


_________________________________________________________________________________


By using this method, ANY devices including android Ice Cream Sandwich
(ICS) and Jelly Bean (JB) devices that can't detect ad-hoc signal can
now share Internet of your PC!


BY THIS POINT, THIS TUTORIAL HAS ENDED. THIS METHOD WORKS TOTALLY FINE IN MY CASE. GOOD LUCK.

How to Change Windows Edition & Version During Setup?

How to Change Windows Edition  & Version During Setup?


how to force Windows 7 setup to allow you to choose the desired edition during installation?
By editing "ei.cfg" file in Windows 7 setup. ("ei.cfg" file can be found in "Sources" folder inside Windows 7 setup disc)


Now here is what the contents of the file mean :


Edition ID

  •   Ultimate
  •   Professional
  •   HomePremium
  •   HomeBasic
  •   Starter

Channel

  •   OEM
  •   Retail

VL (Volume License)

  •   1 (True)
  •   0 (False)