At Last.... The Loooong Lost Mario Game :)

So I was searching "again" for this "Mario" clone I used to play ages ago... And guess what :) I found it this time :) Along with a full story of where it originally started :)


Let Me Start By: >Download<
this is a standalone package that I made using the raptor version :)


Apparently this game was written by a developer called "Mike Wiering" to 'practice VGA programming' as he says :) .


Anyways :) Thank you Mike for creating such a beautiful piece, I had had a lot of good memories with it ;)


Here are the copies I found online:


How to Run The Game:

I tried very hard to get this game to work... and after some research I found that in order to run this game in modern windows enviroment you will need some emulation software like  DOSBox.


In Game Controls:

  • Walk with [Left] and [Right] 
  • Jump with [Alt]
  • Hold [Ctrl] down to run faster and jump further
  • Fire with [Space] (you can use [Up] or [Down] to aim while firing)
  • Press [Down] at the end of a level to go down into the pipe. 
  • Quit the game with [Esc] .


Here is The Developer's Site:
http://www.wieringsoftware.nl

Another mention:
http://www.dosgamesarchive.com

A Collection Of other remakes:
http://compactiongames.about.com

Force A Device Driver Installation

Got a Vista Driver That Won't Install on Windows 7?  Here's How To Fix Most of Those Problems

As I settle into using a Windows 7 laptop all day every day, I run into driver problems now and then.  Now, understand — I'm running 64-bit Windows 7 and I used to run 64-bit Vista, and in theory "if it's a Vista driver, it's a Win 7 driver."  But sometimes it seems that the drivers (or, rather, their driver's setup programs) don't seem to know that, and won't install correctly.  So here are a couple of tips that I've used to good effect.

Has Installing This Driver Been a Problem Even Before Windows 7?

Setting up my Win 7 systems has led to a number of problems installing USB-attached devices.  I started cursing Windows 7, until I eventually remembered that I'd seen problems with some of these drivers before.  I've occasionally had troubles installing drivers for USB-attached devices in XP and Vista if I'm running VMWare Workstation.  VMWare's usually-convenient ability to let me directly connect USB devices to particular VMs has gotten in the way of a few driver installs, but because I'd not run into that problem in a while, I'd forgotten an old rule:  when installing something USB-related for the first time and it won't install, make sure VMWare's not running.

Lie to the Driver

I was trying to get the driver for my Edirol UA-4FX USB audio capture box (the reasonably-priced tool that makes recording my newsletters easy) to load, but it refused, as the driver's setup.exe installation routine complained:
"The operating system that you are using is not supported.  Please check the supported operating systems.  Setup will be terminated."
Ah, I thought, the old "I'm not gonna run even if I could run, just because my programmer put a paranoid version check into the setup program" trick.  Heck, I know how to fix that:  just tell the setup program what it wants to hear.  To do that, make it believe that your OS is not that newfangled, frightening Windows 7 but instead good old Vista SP1.  (Anyone out there remember the "setver" command in DOS?)  Here's how I accomplished it, Windows 7-style:
  1. I right-clicked setup.exe and clicked Properties.
  2. In the resultant property page, I clicked the the "Compatibility" tab.
  3. On that page, I checked the box labeled "Run this program in compatibility mode for" and then selected "Windows Vista (Service Pack 1)."
Thus, when the Setup program asks the operating system its version, Windows 7 responds "Vista SP1" rather than the truth, the setup program gets Win 7 to swallow the drivers and all is well.

Slip the Driver in the Back Door

Even the "call it Vista SP1" thing doesn't work for some drivers, and when that happens, I skip the setup programs and all of the other GUI nonsense and talk directly to the operating system using the pnputil command.  Pnputil.exe is a command that first appeared in Vista.  It's a command-line tool (which means it's also useful in Server Core) that lets you install a driver on a system before you ever physically install the hardware that the driver's associated with, as pnputil has the power to pre-populate the "driver store" with a driver.  To use it, you
  1. Get the driver for the hardware that you want to install.  Different companies package their drivers in different ways, but most either offer a zip file or an EXE that's basically just a self-extracting zip file.
  2. Run the EXE or extract the zip's contents and you'll usually have a folder full of of files with extensions like DLL, CAT, SYS, and at least one with the extension ".INF."
  3. Open an elevated command prompt and type pnputil -i -a name-of-folder\*.inf, like "pnputil -i -a c:\newdriver\*.inf."  The system will think about it for a moment or two and report that you've properly installed the driver.
Now, understand that this won't fix all problems, as some drivers were written sort of lamely in the first place back in the Vista days (like the ones for my Tascam US-144), but these should help in many cases.

From:
 www.minasi.com/newsletters/nws0908a.htm

Reverse Tethering...

How to share your PC internet connection from your PC to your Android phone using the USB cable:


There are several ways of achieving this, most notable ones are:

In both methods you will need SAMSUNG USB NDIS Network Drivers 
From Here

Use your windows 7 to setup a Software Access Point

This Is A Very Beautiful and Useful Blog Post that I HAD TO re-blog :)
Many Thanks For the Original Writer :) 


This is about sharing your PC internet connection wirelessly with your devices


here is another useful Post & Tool

==================================

[Tutorial]
Use your windows 7 to setup a Software Wireless Access Point (SoftAP)
to share your PC Internet connection without any extra hardware or
software (NOT Ad-Hoc)


I got my Nexus 7 a few days ago, and it doesn't have a 3g modem in it. That means I cannot use a mobile internet with this device. Tried to create an ad hoc network in my windows 7 pc, and it cannot even detect the ad hoc network. This is already a known problem for android ICS (ice Cream Sandwich) and Jelly Bean. After some research, I found out that ICS and JB only can detect
"Infrastructure" based WiFi signal. Ad hoc network is using another type of signal that ICS and JB cannot detect unless you root and tweak your phone's wpa_supplicant files. In which they are known to cause abnormal behavior of the OS itself.


     So, I call myself an IT professional and a hacker.
How can I surrender to such a small problem! There must be a solution
somewhere. Again, after some research, I realized that Windows 7
actually provide 2 drivers for a network card. Basically 1 of it is what
you use everyday, as a client that receive service from an AP. The
other 1, is the driver to make your wireless network card an wireless
access point itself! (SoftAP)


“On
Windows 7 and later, the operating system installs a virtual device if a
Hosted Network capable wireless adapter is present on the machine. This
virtual device normally shows up in the “Network Connections Folder” as
‘Wireless Network Connection 2’ with a Device Name of ‘Microsoft
Virtual WiFi Miniport adapter’ if the computer has a single wireless
network adapter. This virtual device is used exclusively for performing
software access point (SoftAP) connections and is not present in the
list returned by the WlanEnumInterfaces function. The lifetime of this
virtual device is tied to the physical wireless adapter. If the physical
wireless adapter is disabled, this virtual device will be removed as
well.”


OK! SO THEY HAVE THIS HANDY FEATURE BUT WHY I NEVER SEE IT?


ANSWER: Basically there is no native GUI to do all this, so you have to use command prompt to do all this.


Following will be the step by step guide to setup a SoftAP using your windows 7 without any additional application. If you want to use an application to do this, there are some out there in the market, 1 of it i think is good is called Connectify, I never tried it though so I won't comment on it.


Basically, to setup an SoftAP, then share ur PC internet to this SoftAP
and then make sure devices that connect to this SoftAP takes 5 major
steps:


1) Setup the SoftAP

2) Share the Internet to SoftAP

3) Startup the services required for Internet Sharing

4) Start your SoftAP

5) make sure your device connect properly to the SoftAP


and here we GO:

________________________________________________________

1) Setup the SoftAP


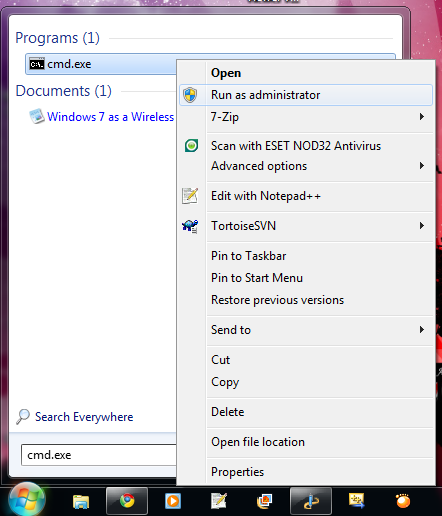
i) Run cmd.exe as administrator and enter the following command.
Substitute "ssid" with the SoftAP name u  desired and "passphrase" with
the password to connect to the SoftAP u desired, both without the
quotation marks. This will create the required “Microsoft Virtual WiFi
Miniport adapter” and also set up your hostednetwork.


netsh wlan set hostednetwork mode=allow ssid="ssid" key="passphrase" keyUsage=persistent

Run cmd as Administrator
The command and its appropriate output if success (Click to enlarge)
Microsoft Virtual WiFi Miniport Adapter will shown if success (Click to enlarge)
     Voila, first step is done, your SoftAP interface is now available, next up we will need to do the Internet sharing.

_________________________________________________________________________________

2) Share the Internet to SoftAP


i) Open network and sharing centre

ii) Click Change Adapter Setting

iii) Select the adapter that are connected to the internet, "Right Click" -> "Properties"

iv) Click on "Sharing' tab

v) Check the checkbox that says "Allow other network users to connect
through this computer's Internet connection". In the dropdownbox, select
the SoftAP (In my case, Wireless Network Connection 5)

Click to enlarge
vi) Step 2 DONE!


_________________________________________________________________________________

3) Startup the services required for Internet Sharing


This step is the most technical step of all the steps


i) Run services.msc. (Type services.msc in start menu and you will have it)

ii) Find the following item in the list and start them IF THEY ARE NOT (Right click -> Start):


**If you want these services start after you restart computer, change their properties to Automatic**

--

Application Layer Gateway Service

Network Connections

Network Location Awareness (NLA)

Plug And Play

Remote Access Auto Connection Manager

Remote Access Connection Manager

Remote Procedure Call (RPC)

Telephony

Windows Firewall

--

**If you want these services start after you restart computer, change their properties to Automatic**


Click to enlarge
iii) After all services are started, Step 3 is done


_________________________________________________________________________________

4) Start your SoftAP


This step is easy, the command to start/stop the hostednetwork is “netsh wlan start|stop hostednetwork”
and it needs to be run as adminstrator. Since you will have to
start/stop the hostednetwork every time you start/stop your computer, I
would advice you to create desktop shortcuts for there commands and set
them to run as administrator.


Shortcut to start hostednetwork
Shortcut to stop the hostednetwork
MISSION ACCOMPLISHED!! After run "netsh wlan start hostednetwork"


_________________________________________________________________________________

5) make sure your device connect properly to the SoftAP


Now, the setup of this AP is successful. In order to connect to this
SoftAP, I find it best to use static IP, else it will have quite some
connection problem. The setting is as following:


**Set this in the device you want to connect to the SoftAP**

--

IP: range from 192.168.137.2 to 192.168.137.254

Subnet mask: 255.255.255.0

Default gateway: 192.168.137.1

DNS: 8.8.8.8

alternate DNS: 8.8.4.4

--

**Set this in the device you want to connect to the SoftAP**


_________________________________________________________________________________


By using this method, ANY devices including android Ice Cream Sandwich
(ICS) and Jelly Bean (JB) devices that can't detect ad-hoc signal can
now share Internet of your PC!


BY THIS POINT, THIS TUTORIAL HAS ENDED. THIS METHOD WORKS TOTALLY FINE IN MY CASE. GOOD LUCK.

How to Change Windows Edition & Version During Setup?

How to Change Windows Edition  & Version During Setup?


how to force Windows 7 setup to allow you to choose the desired edition during installation?
By editing "ei.cfg" file in Windows 7 setup. ("ei.cfg" file can be found in "Sources" folder inside Windows 7 setup disc)


Now here is what the contents of the file mean :


Edition ID

  •   Ultimate
  •   Professional
  •   HomePremium
  •   HomeBasic
  •   Starter

Channel

  •   OEM
  •   Retail

VL (Volume License)

  •   1 (True)
  •   0 (False)