
I got my Nexus 7 a few days ago, and it doesn't have a 3g modem in it. That means I cannot use a mobile internet with this device. Tried to create an ad hoc network in my windows 7 pc, and it cannot even detect the ad hoc network. This is already a known problem for android ICS (ice Cream Sandwich) and Jelly Bean. After some research, I found out that ICS and JB only can detect
"Infrastructure" based WiFi signal. Ad hoc network is using another type of signal that ICS and JB cannot detect unless you root and tweak your phone's wpa_supplicant files. In which they are known to cause abnormal behavior of the OS itself.
So, I call myself an IT professional and a hacker.
How can I surrender to such a small problem! There must be a solution
somewhere. Again, after some research, I realized that Windows 7
actually provide 2 drivers for a network card. Basically 1 of it is what
you use everyday, as a client that receive service from an AP. The
other 1, is the driver to make your wireless network card an wireless
access point itself! (SoftAP)
“On
Windows 7 and later, the operating system installs a virtual device if a
Hosted Network capable wireless adapter is present on the machine. This
virtual device normally shows up in the “Network Connections Folder” as
‘Wireless Network Connection 2’ with a Device Name of ‘Microsoft
Virtual WiFi Miniport adapter’ if the computer has a single wireless
network adapter. This virtual device is used exclusively for performing
software access point (SoftAP) connections and is not present in the
list returned by the WlanEnumInterfaces function. The lifetime of this
virtual device is tied to the physical wireless adapter. If the physical
wireless adapter is disabled, this virtual device will be removed as
well.”
OK! SO THEY HAVE THIS HANDY FEATURE BUT WHY I NEVER SEE IT?
ANSWER: Basically there is no native GUI to do all this, so you have to use command prompt to do all this.
Following will be the
step by step guide to setup a SoftAP using your windows 7 without any additional application. If you want to use an application to do this, there are some out there in the market, 1 of it i think is good is called
Connectify, I never tried it though so I won't comment on it.
Basically, to setup an SoftAP, then share ur PC internet to this SoftAP
and then make sure devices that connect to this SoftAP takes 5 major
steps:
1) Setup the SoftAP
2) Share the Internet to SoftAP
3) Startup the services required for Internet Sharing
4) Start your SoftAP
5) make sure your device connect properly to the SoftAP
and here we GO:
________________________________________________________
1) Setup the SoftAP
i) Run cmd.exe as administrator and enter the following command.
Substitute "ssid" with the SoftAP name u desired and "passphrase" with
the password to connect to the SoftAP u desired, both without the
quotation marks. This will create the required “Microsoft Virtual WiFi
Miniport adapter” and also set up your hostednetwork.
netsh wlan set hostednetwork mode=allow ssid="ssid" key="passphrase" keyUsage=persistent
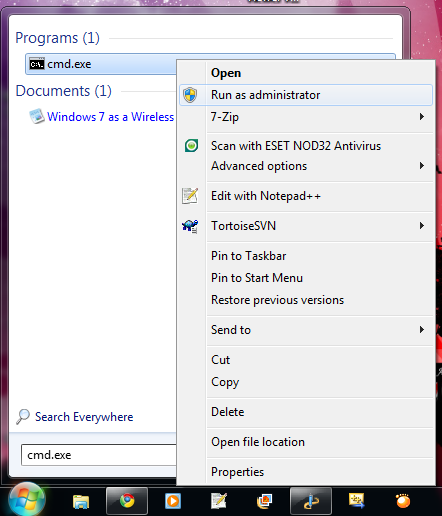 |
| Run cmd as Administrator |
 |
| The command and its appropriate output if success (Click to enlarge) |
 |
| Microsoft Virtual WiFi Miniport Adapter will shown if success (Click to enlarge) |
Voila, first step is done, your SoftAP interface is now available, next up we will need to do the Internet sharing.
_________________________________________________________________________________
2) Share the Internet to SoftAP
i) Open network and sharing centre
ii) Click Change Adapter Setting
iii) Select the adapter that are connected to the internet, "Right Click" -> "Properties"
iv) Click on "Sharing' tab
v) Check the checkbox that says "Allow other network users to connect
through this computer's Internet connection". In the dropdownbox, select
the SoftAP (In my case, Wireless Network Connection 5)
 |
| Click to enlarge |
vi) Step 2 DONE!
_________________________________________________________________________________
3) Startup the services required for Internet Sharing
This step is the most technical step of all the steps
i) Run services.msc. (Type services.msc in start menu and you will have it)
ii) Find the following item in the list and start them IF THEY ARE NOT (Right click -> Start):
**If you want these services start after you restart computer, change their properties to Automatic**
--
Application Layer Gateway Service
Network Connections
Network Location Awareness (NLA)
Plug And Play
Remote Access Auto Connection Manager
Remote Access Connection Manager
Remote Procedure Call (RPC)
Telephony
Windows Firewall
--
**If you want these services start after you restart computer, change their properties to Automatic**
 |
| Click to enlarge |
iii) After all services are started, Step 3 is done
_________________________________________________________________________________
4) Start your SoftAP
This step is easy, the command to start/stop the hostednetwork is
“netsh wlan start|stop hostednetwork”
and it needs to be run as adminstrator. Since you will have to
start/stop the hostednetwork every time you start/stop your computer, I
would advice you to create desktop shortcuts for there commands and set
them to run as administrator.
 |
| Shortcut to start hostednetwork |
 |
| Shortcut to stop the hostednetwork |
 |
| MISSION ACCOMPLISHED!! After run "netsh wlan start hostednetwork" |
_________________________________________________________________________________
5) make sure your device connect properly to the SoftAP
Now, the setup of this AP is successful. In order to connect to this
SoftAP, I find it best to use static IP, else it will have quite some
connection problem. The setting is as following:
**Set this in the device you want to connect to the SoftAP**
--
IP: range from 192.168.137.2 to 192.168.137.254
Subnet mask: 255.255.255.0
Default gateway: 192.168.137.1
DNS: 8.8.8.8
alternate DNS: 8.8.4.4
--
**Set this in the device you want to connect to the SoftAP**
_________________________________________________________________________________
By using this method, ANY devices including android Ice Cream Sandwich
(ICS) and Jelly Bean (JB) devices that can't detect ad-hoc signal can
now share Internet of your PC!
BY THIS POINT, THIS TUTORIAL HAS ENDED. THIS METHOD WORKS TOTALLY FINE IN MY CASE. GOOD LUCK.


